|
Information
|
|
Data sent across the public Internet is generally not protected from prying eyes,
but you can make your Internet communications secure and extend your private network
with a virtual private network (VPN) connection. A VPN connection uses encryption and
tunneling to transfer data securely on the Internet to a remote access VPN server on
your workplace network.
|
|
To make a VPN connection, you must be already connected to the Internet. You can make
a VPN connection by first dialing an Internet service provider (ISP) or by using an
existing connection to the Internet.
|
|
If you connect to the Internet using a dial–up connection, you first connect to your
ISP and then you make a VPN connection to the private network’s VPN server. After the
VPN connection is established, you can access the private network.
|
|
If you are already connected to the Internet—on a local area network, a cable modem,
or a digital subscriber line (DSL)—you can make a VPN connection directly to the VPN server.
|
|
To make a VPN connection
|
|
1. Open Network Connections. (Click Start, click Control Panel,
click Network and Internet Connections, and then click Network Connections.)
|
|
2. Under Network Tasks, click Create a new connection, and then click Next.
|
|
3. On the Welcome to the New Connection Wizard page of the New Connection Wizard,
click Next.
|
|
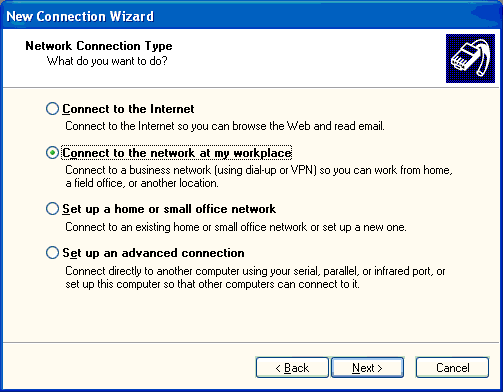
4. On the Network Connection Type page, click Connect to the network at my workplace,
and then click Next as shown below.
|
|
|
|
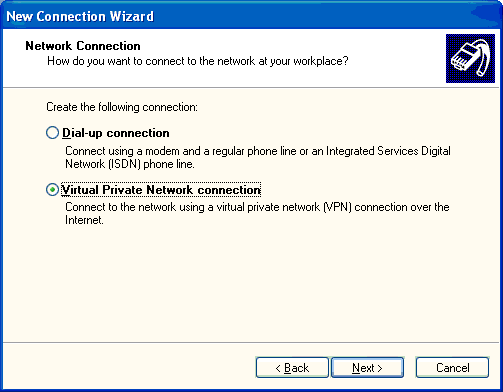
5. On the Network Connection page, click Virtual Private Network connection,
and then click Next as shown below.
|
|
|
|
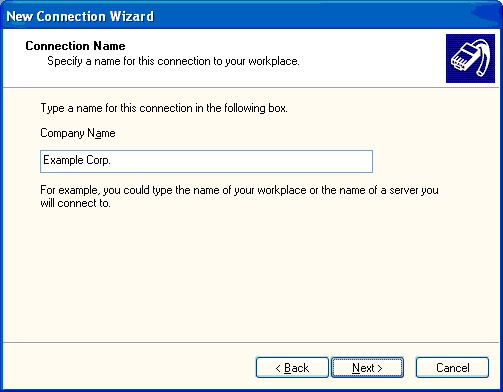
6. On the Connection Name page, type the name of the connection or your company name, and
then click Next. An example is shown below.
|
|
|
|
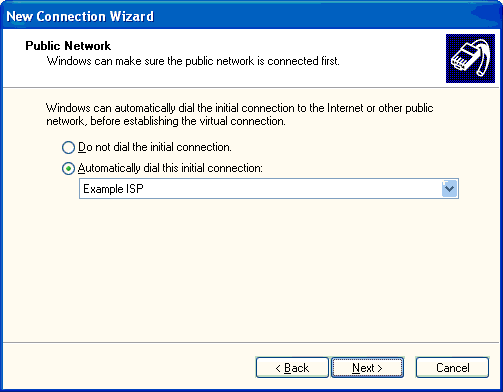
7. If you are using a dial-up connection to an ISP to connect to the Internet, the Public Network
page is displayed. In Automatically dial this initial connection, select the name of the
connection used to dial your ISP, and then click Next. An example is shown below.
|
|
|
|
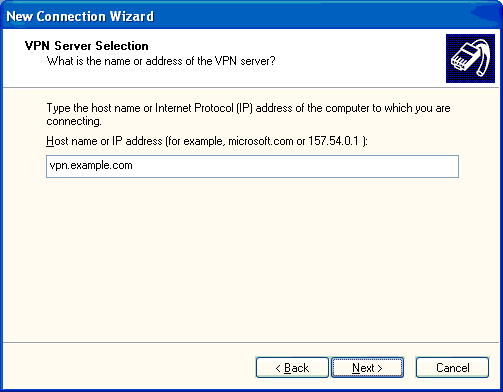
8. On the VPN Server Selection page, type the Domain Name System (DNS) name or
Internet Protocol (IP) address of your company's VPN server on the Internet,
and then click Next. An example is shown below.
|
|
|
|
9. On the Completing the New Connection Wizard page, click Finish.
10. A Connect dialog box is displayed. Type the user name and password to access your
company's private network and then click Connect. An example is shown below.
|
|

|
|
Notes:
You can create multiple VPN connections by copying them in the Network Connections folder.
You can then rename the connections and modify connection settings. By doing so,
you can easily create different connections to accommodate multiple hosts, security options, and so on.
If you have an active Winsock Proxy client, you cannot create a VPN connection.
A Winsock Proxy client immediately redirects data to a configured proxy server
before the data can be processed in the fashion required by a VPN connection.
To establish a VPN connection, you should disable the Winsock Proxy client.
|

